Using Cyckei
First Launch
Cyckei can be launched for the first time from the root folder using:
python cykei.py
Upon first launch, Cyckei will create a cyckei directory in the
user’s home folder to hold scripts, test results, logs, and
configuration. Cyckei will also create a server_data text file that facilitates
the clients memory of the server’s activities.
Before running tests, Cyckei must be configured to properly interface with any devices. Each channel should
be setup in the config.json file with the correct GPIB address and any other
relevant information. A default configuration is automatically
generated, and instructions on further configuration can be found in the Editing Configuration section.
Client, Server, and Explorer
Cyckei comes with three sibling applications: A server, a client, and the explorer. The server and client act in tandem, while the explorer is independent. Server performs the work of sending commands to cycle cells, while the client provides the user an interface to interact with the server. The explorer is used for viewing completed tests and creating new scripts to be run by the server.
The server should be launched before a client from the root directory with
python cyckei.py server
If a client does not have a server to connect to, it will be essentially non functional. After the server is launched the client can be launched from the root directory with
python cyckei.py client
Finally, the explorer can be launched from the root directory with
python cyckei.py explorer
On Windows a bash file can be set up as a shortcut to run each command sequence.
Starting a cycle
Various attributes of the cycle may be set in before starting a cycle:
| Option | Type | Description |
|---|---|---|
| Script | file | Script with desired protocol. Gives option to select any local file. |
| Log file | text | Path to output file. Placed in the specified logs folder. |
| Cell ID | text | Identification for cell. Recorded to output file. |
| Comment | text | Requester’s comment for cycle. Recorded to output file. |
The available buttons can be used to Start, Stop, Pause, or Resume the protocol.
Creating Scripts
Scripts can be created in the user’s preferred editor or in the separate explorer application. This editor will automatically load the default included scripts, but can be used to open and edit any local files.
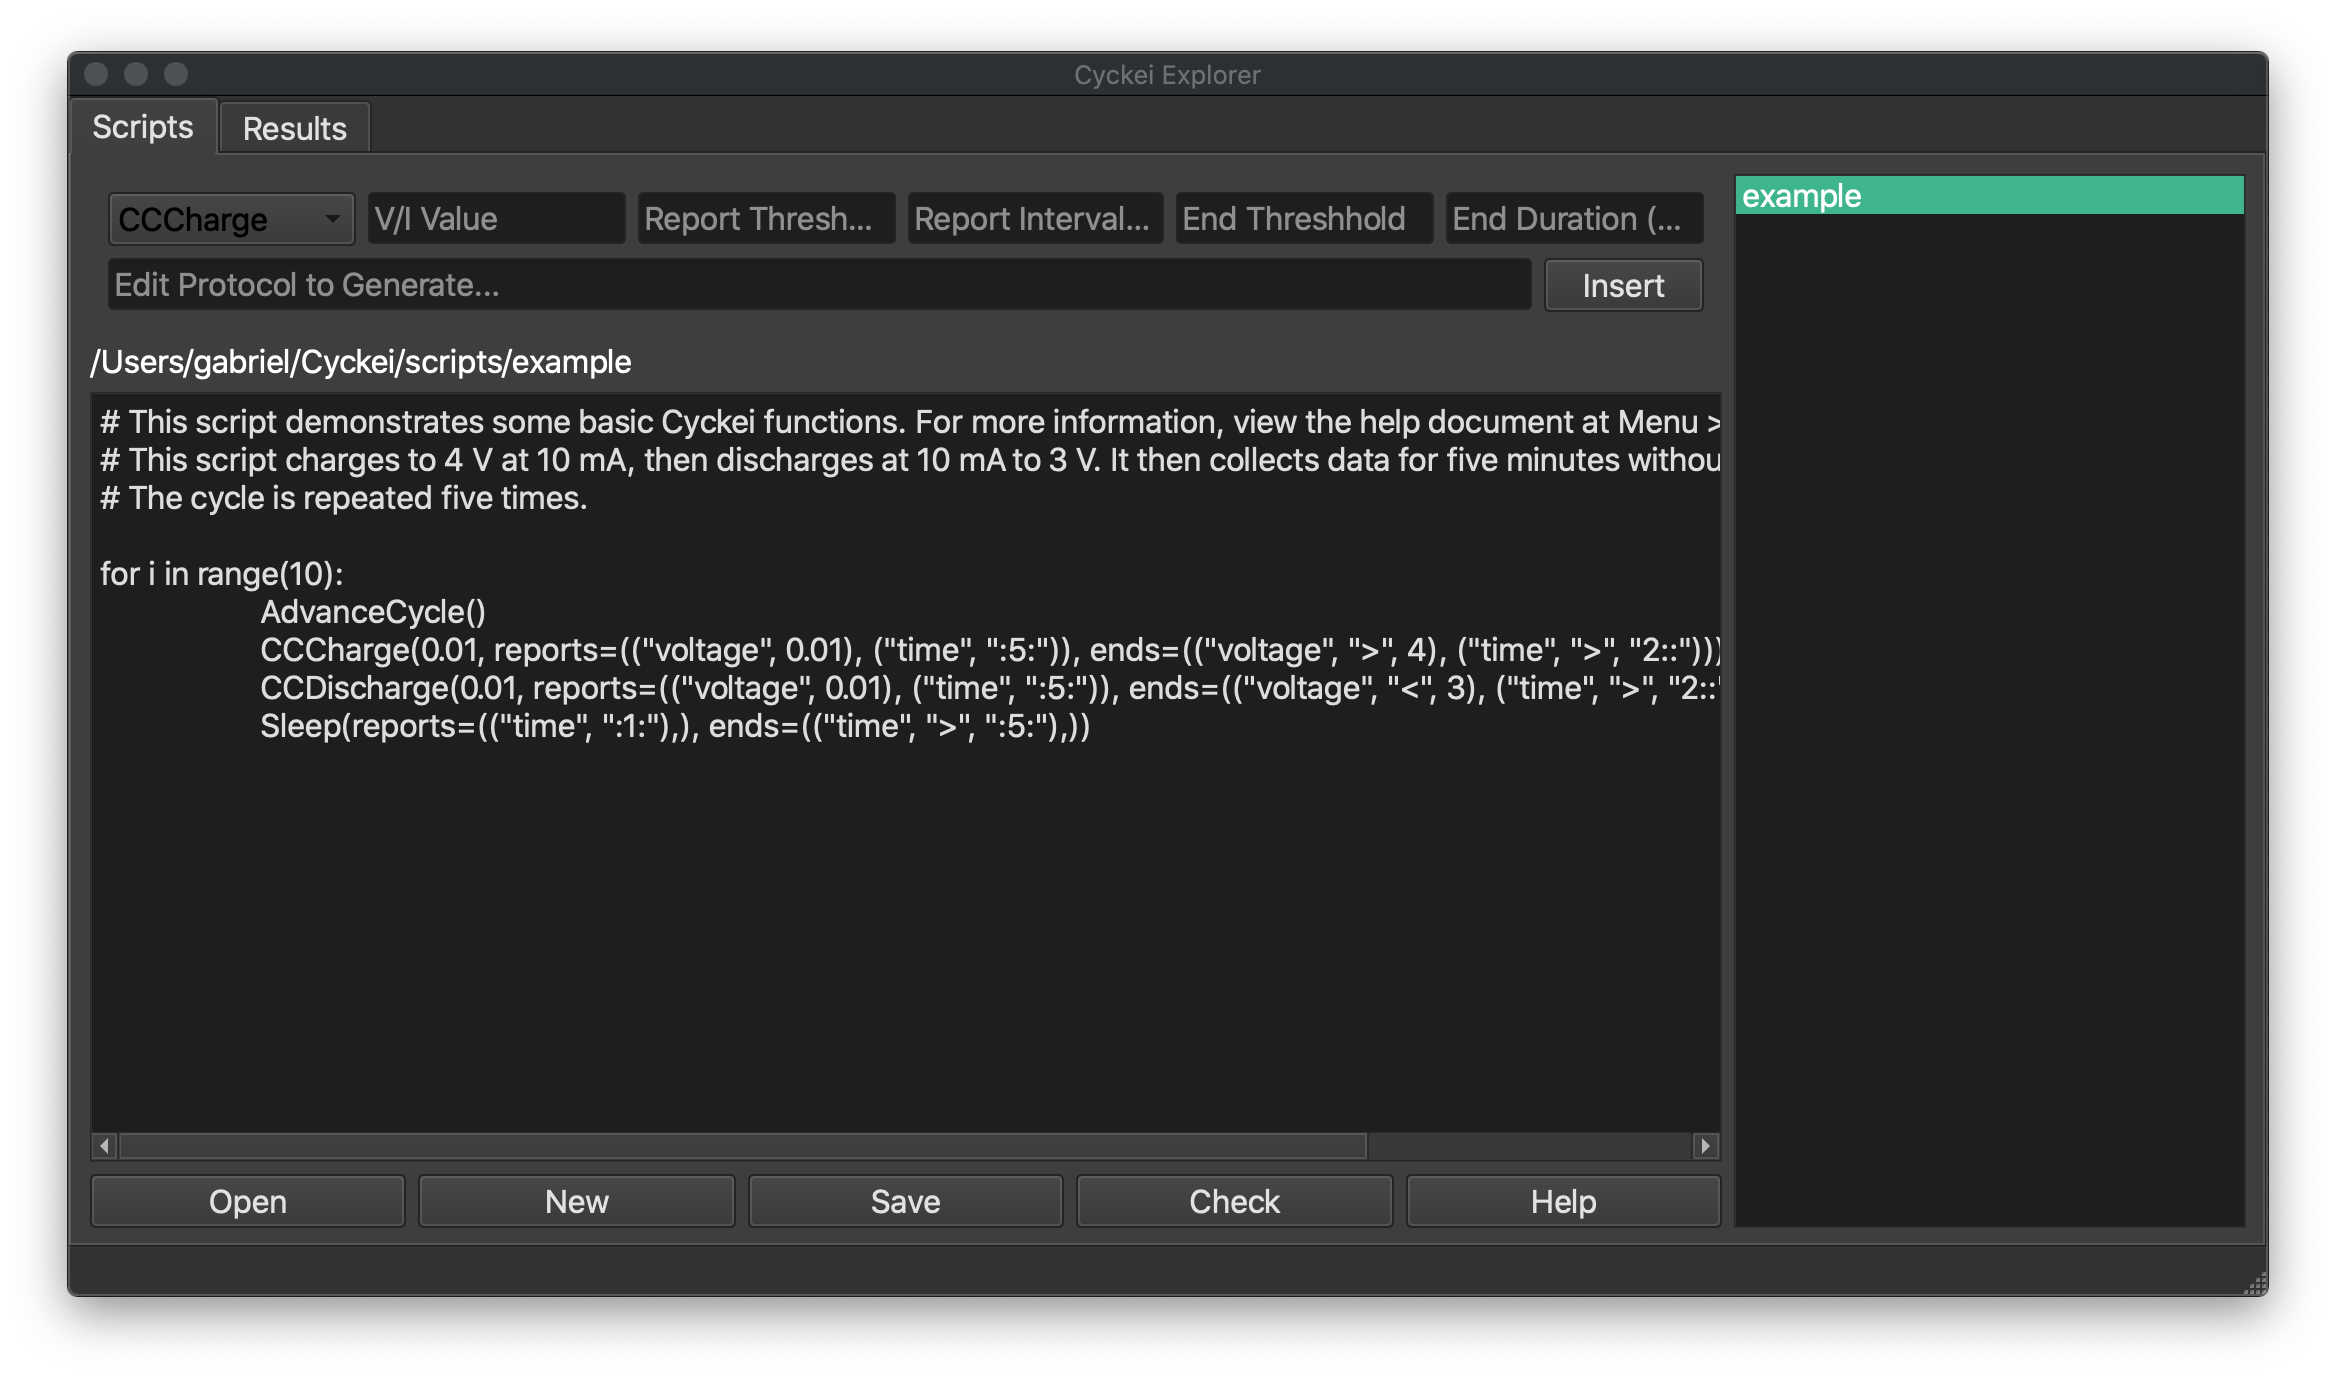
The explorer includes a protocol generator above the editor to streamline script creation. This can be used to specify attributes, and insert generated lines of code into the script.
Scripts are written in regular python code, and can contain for loops and other statements to control cycle flow. There are seven built in protocols to control the cycler. Most of these protocols take some or all of the following parameters:
| Parameter | Description | Format |
|---|---|---|
| Value | Set a certain voltage or current to run at. | float |
| Reports | Set intervals of time and/or change in voltage or current to record at. | reports=((“current”, float), (“time”, “int:int:int”)) |
| Ends | Set threshold of time and/or change in voltage or current to end current protocol. | ends=((“current”, “<”, float), (“time”, “>”, “int:int:int”)) |
The following protocols are available:
| Protocol | Description | Parameters | Example |
|---|---|---|---|
| AdvanceCycle | Start recording under next cycle in output file. | None | AdvanceCycle() |
| CCCharge | Charge at a set current. | Value, Reports, Ends | CCCharge(0.1, reports=((“voltage”, 0.01), (“time”, “:5:”)), ends=((“voltage”, “>”, 4.2), (“time”, “>”, “4::”))) |
| CCDischarge | Discharge at a set current. | Value, Reports, Ends | CCDischarge(0.1, reports=((“voltage”, 0.01), (“time”, “:5:”)), ends=((“voltage”, “<”, 3.0), (“time”, “>”, “4::”))) |
| CVCharge | Charge at a set voltage. | Value, Reports, Ends | CVCharge(4.2, reports=((“current”, 0.01), (“time”, “:5:”)), ends=((“current”, “<”, 0.005), (“time”, “>”, “24::”))) |
| CVDischarge | Discharge at a set voltage. | Value, Reports, Ends | CVDischarge(4.2, reports=((“current”, 0.01), (“time”, “:5:”)), ends=((“current”, “<”, 0.005), (“time”, “>”, “24::”))) |
| Rest | Record at a set interval. | Reports, Ends | Rest(reports=((“time”, “::1”),), ends=((“time”, “>”, “::15”),)) |
| Sleep | Record at a set interval and turn channel off in between. | Reports, Ends | Sleep(reports=((“time”, “:1:0”),), ends=((“time”, “>”, “::15”),)) |
An example script is shown below. There is also a simple script saved in the scripts folder which is available whenever the client is started.
for i in range(3):
  AdvanceCycle()
  CCCharge(0.1, reports=(("voltage", 0.01), ("time", ":5:")), ends=(("voltage", ">", 4.2), ("time", ">", "4::")))
  CCDischarge(0.1, reports=(("voltage", 0.01), ("time", ":5:")), ends=(("voltage", "<", 3.0), ("time", ">", "4::")))
  Rest(reports=(("time", "::1"),), ends=(("time", ">", "::15"),))
It is important to note that variables cannot be assigned in the standard pythonic way
C = 0.1
However, for loops can be used to capture values as variables as shown in this next example where C is caputred as 0.1 A and substituted in for C in the CCCharge and CCDischarge protocols.
The example also shows the nesting of loops. In this case a total of 500 cycles would be completed, where C/4 cycling is done with a C/20 cycle every 50 cycles.
for C in [0.1]:
    for i in range(10):
        AdvanceCycle()
        CCCharge(C/20, reports=(("voltage", 0.005), ("time", ":5:")), ends=(("voltage", ">=", 4.2), ("time", ">", "30::")))
        CCDischarge(C/20, reports=(("voltage", 0.005), ("time", ":5:")), ends=(("voltage", "<", 3), ("time", ">", "30::")))
        for j in range(49):
            AdvanceCycle()
            CCCharge(C/4, reports=(("voltage", 0.005), ("time", ":1:")), ends=(("voltage", ">=", 4.2), ("time", ">", "6::")))
            CCDischarge(C/4, reports=(("voltage", 0.005), ("time", ":1:")), ends=(("voltage", "<", 3), ("time", ">", "6::")))
Access to the python interpreter allows powerful options. The next example shows testing of rate capability in a convenient loop. Three cycles are completed at discharge rates of C/20, C/10, C/5, C/2, and C with the charge remaining C/20 in all cases.
for C in [0.1]:
    for X in [20,10,5,2,1]:
        for i in range(3):
            AdvanceCycle()
            CCCharge(C/20, reports=(("voltage", 0.005), ("time", ":5:")), ends=(("voltage", ">=", 4.2), ("time", ">", "30::")))
            CCDischarge(C/X, reports=(("voltage", 0.005), ("time", ":5:")), ends=(("voltage", "<", 3), ("time", ">", "30::")))
Scripts are automatically checked when they are sent to the server. They can also be manually checked by clicking the “Check” button below the editor. Checking a script ensures that (1) the script only contains legal arguments and (2) can be loaded by the server without immediate errors. Checking your scripts is a good practice to mitigate possible formatting issues and errors. However, care should still be taken while writing scripts as they are executed as any other python code within the application.
Using Plugins
Data plugins are available to supplement current and voltage data measurements.
The plugin scheme is designed to be flexible in order to support any device with the use of custom configuration.
A random plugin is included by default with the Cyckei distribution.
Other plugins can be written by developing a similar DataController object and including it in the plugins folder of the Cyckei recording directory.
Below is an example plugin for reference.
import logging
from random import randint

logger = logging.getLogger('cyckei')

class DataController(object):
    def __init__(self):
        self.name = "random"
        logger.info("Initializing Random Recorder plugin")

    def read(self):
        logger.debug("Generating random integer...")
        return randint(1, 101)
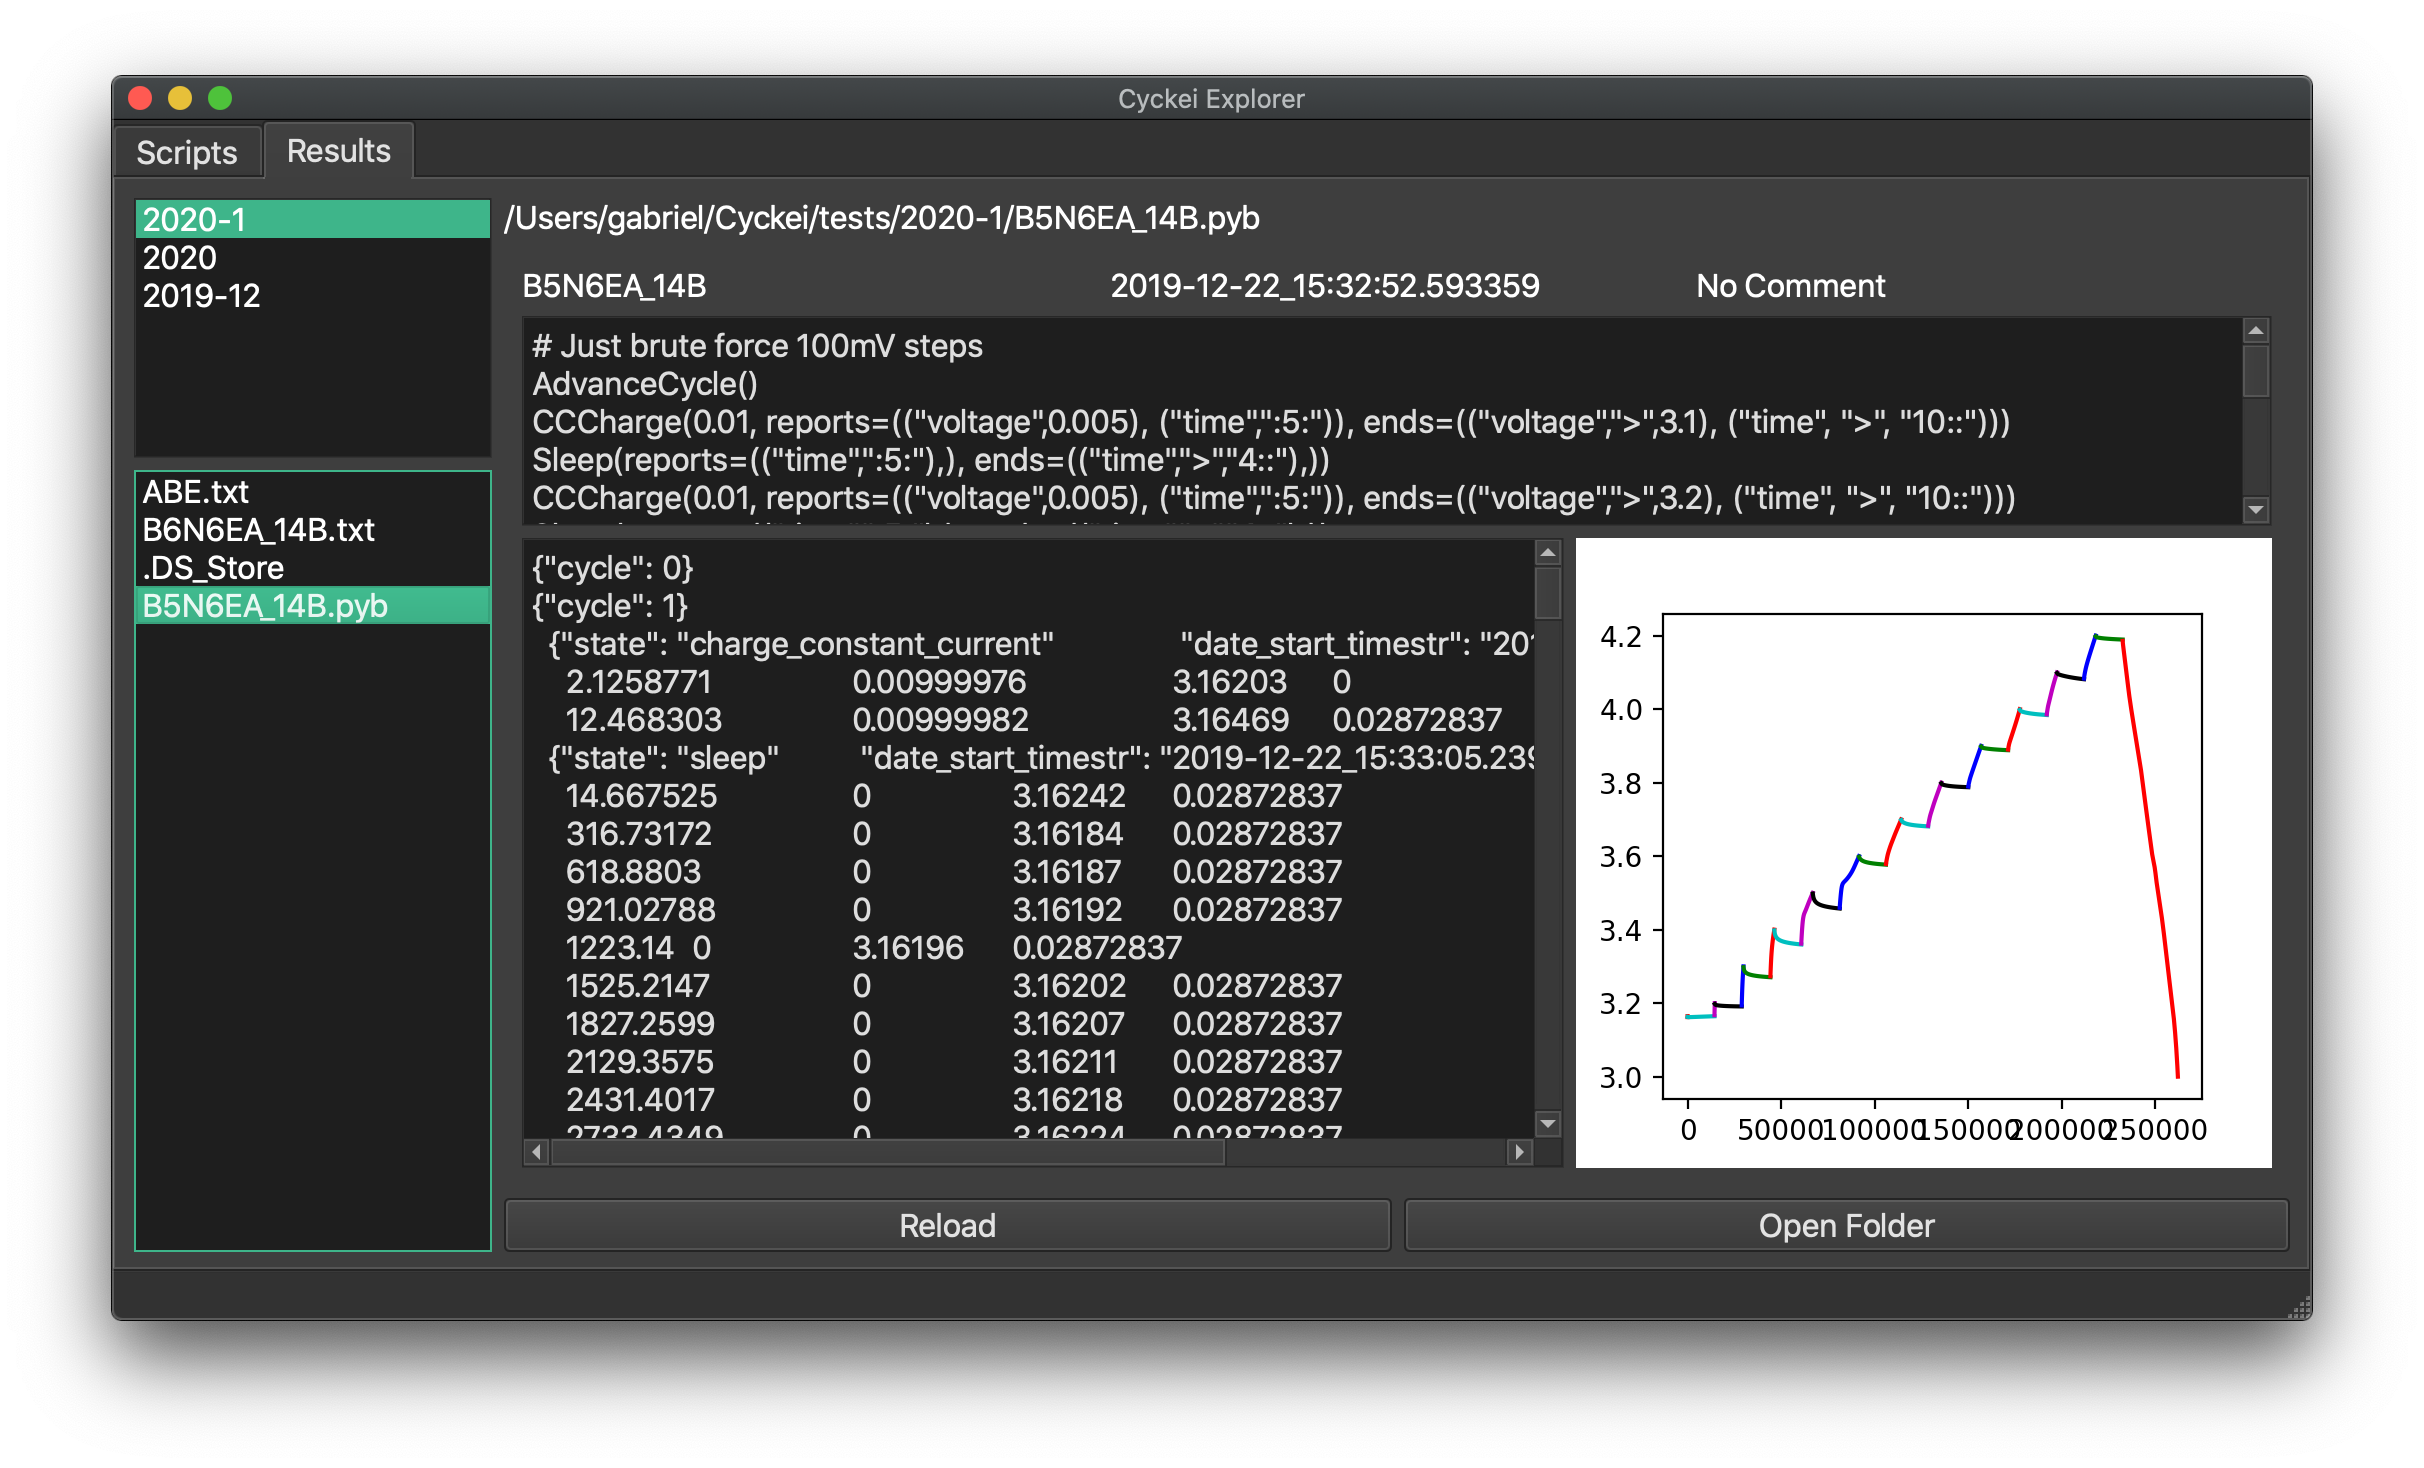
Viewing Results
Results are created to document measurements from each cell throughout it’s
cycle. They also have details about the cell and the cycle that was run
on it. Result files are saved to the tests folder specified in the
configuration under the specified name. To view a result file from the client
application, just open the explorer application. All result files are automatically
loaded on startup in the explorer application, and new or updated ones can be viewed after clicking
reload. Although you can copy the contents of a result file to an excel
spreadsheet, result files should not be opened with excel or another
application directly. Doing this can cause the file to become locked and
prevent Cyckei from editing it.
Viewing Logs
Log text files are stored in the logs folder in Cyckei. These logs capture
information about the exectuion of their respective program. For example:
server or client logs. In these files Errors, Warnings, and different steps
in the exectution of the programs are stored.
Editing Configuration
Editing the configuration file is crucial for the client to function properly. Any custom configuration files should be written in JSON and should mirror the default config.json in the program’s root directory. Each section is described in more detail below:
channels - A list of channels currently connected to the computer.
- channel (string) - Channel number for identification within the application.
- gpib_address (int) - Hardware address of GPIB interface can be found with a NI VISA application or wth the code in Plugin Overview.
- keithley_model (string) - Model number of keithley being used.
- keithley_channel (string) - Particular channel on said keithley (a or b).
zmq - A dictionary of properties that control how the client and server communicate.
*zmq* is now stored in variables.ini in the cyckei assets file
- port (int) - Port to communicate over.
- client-address (string) - Address for the client to connect to. Usually localhost.
- server-address (string) - Address for the server to listen on. Usually all.
- timeout (int) - Number of seconds to wait for server response. 10 seconds seems to work well for most configurations.
data-plugins - A list of data plugins to load and execute alongside normal data collection. Plugins should be placed in the
pluginsdirectory of the Cyckei recording folder.device - The identifier for which device to load. Currently,
keithley2602is the only acceptable model.verbosity - The amount of information to be saved to log files. Generally should be set to 20, but the following levels can also be used. Lower values print more information for debugging purposes.
- Critical - 50
- Error - 40
- Warning - 30
- Info - 20
- Debug - 10
- Notset - 0
Here is an example configuration file for a simple setup running on port 5556 with one Keithley with address 5:
{
    "channel_readme": "List of keithley channels to connect.",
    "channels": [
      {
        "channel": 1,
        "gpib_address": 9,
        "keithley_channel": "a",
        "model": "2602B"
      },
      {
        "channel": 2,
        "gpib_address": 9,
        "keithley_channel": "b",
        "model": "2602B"
      },
      {
        "channel": 3,
        "gpib_address": 5,
        "keithley_channel": "a",
        "model": "2602B"
      },
      {
        "channel": 4,
        "gpib_address": 5,
        "keithley_channel": "b",
        "model": "2602B"
      }
    ],
    "zmq":{
        "port": 5556,
        "client-address":"tcp://localhost",
        "server-address":"tcp://*",
        "timeout": 10
    },
    "plugins_readme": "List of plugins to connect, each declaring sources.",
    "plugins": [
      {
        "name": "randomizer",
        "module": "randomizer",
        "enabled": false,
        "sources": [
          {
            "port": null,
            "meta": [1, 10]
          },
          {
            "port": null,
            "meta": [11, 20]
          }
        ]
      }
    ],
    "verbosity": 30
}